The Job
Note: Do yourself a favor and listen to the podcast as you are flipping through this post. It will make a lot more sense as I skipped over lots of details when doing the written stuff.
On the podcast today we are looking at a recent spot I was the director of photography on and breaking down the lighting and camera set ups. The ad wasn’t the longest in the world but there were a few gotchas (like there are on all jobs) and I thought I’d share how we managed to get around them here.
The biggest issue that we are going to be focusing on is managing Daylight Exterior shooting when you are forced in to a location/time that isn’t the most attractive photographically speaking.
The Final Spot:
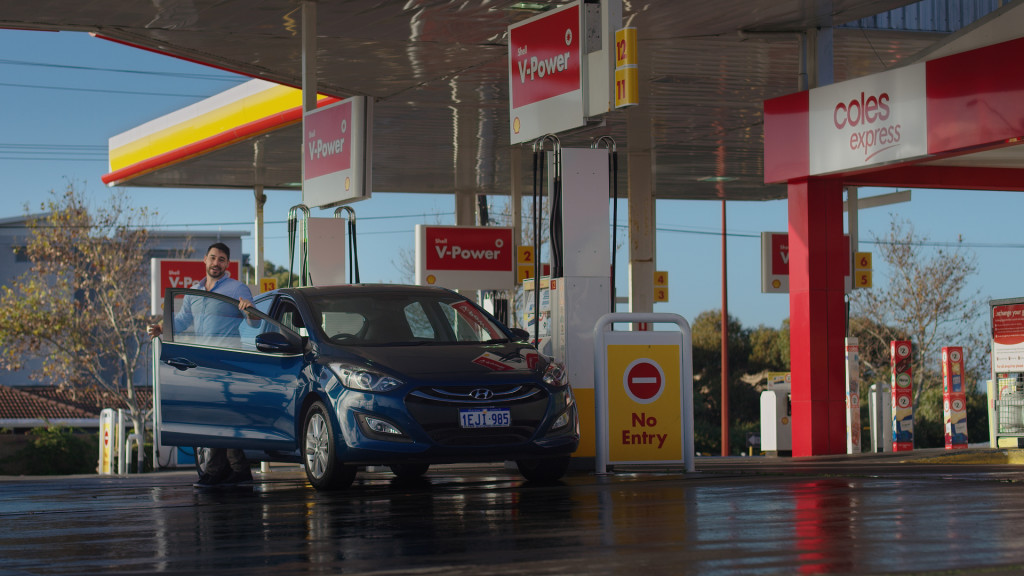
The Wide (Shot #1):
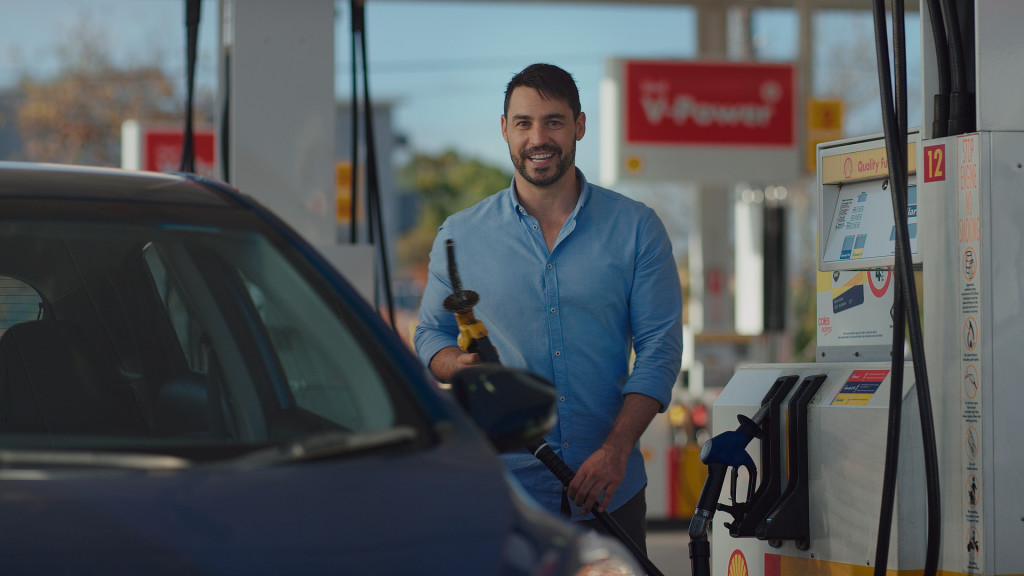
The Medium (Shot #2):
The Product (Shot #3):
The Brief:
Good looking, not terribly moody but not too flat either.
The Location:
The location was a gas station where the orientation of the street meant that most of the action would be facing due east.
Anytime you are forced in to shooting somewhere where there is an overhang during the daytime things can get pretty ugly pretty fast. You have to deal with the contrast difference between the foreground darkness created by the overhang and, if it is sunny, the much hotter background.
The Trouble:
The orientation was always going to be an issue but on top of that the schedule dictated that we needed to shoot some Night for Day stuff and then shoot the rest of the exteriors very early in the day.
With the location and the schedule locked the next step was coming up with a plan for getting this thing looking half way decent.
The Set Up:
We were shooting on the RED Epic Dragon @ 6k HD framing with a 5k HD mask. The mask was used so the director could then comp in some handheld motion even though the camera spent all day on a chapman dolly.
The ISO moved from 250 – 500. The OLPF was the Skin Tone & Highlight OLPF. This was an important choice as it was critical to the final look to make sure we had as much highlight head room as possible.
This was shot on Arri/Zeiss Master Primes. I think in the end we used a 65, 75, and 100mm.
Breakdowns – Daylight Exterior
The Wide
Let’s talk about the wide first.
The Problems:
- It is 9:00 AM. The orientation of the sun means that it is hitting the talent from 90 degrees to camera. Not super flattering.
- Because this is a working gas station we couldn’t have any lamps within a certain amount of meters from the pumps.
- The background/sky is getting blasted with sun.
The Solution:
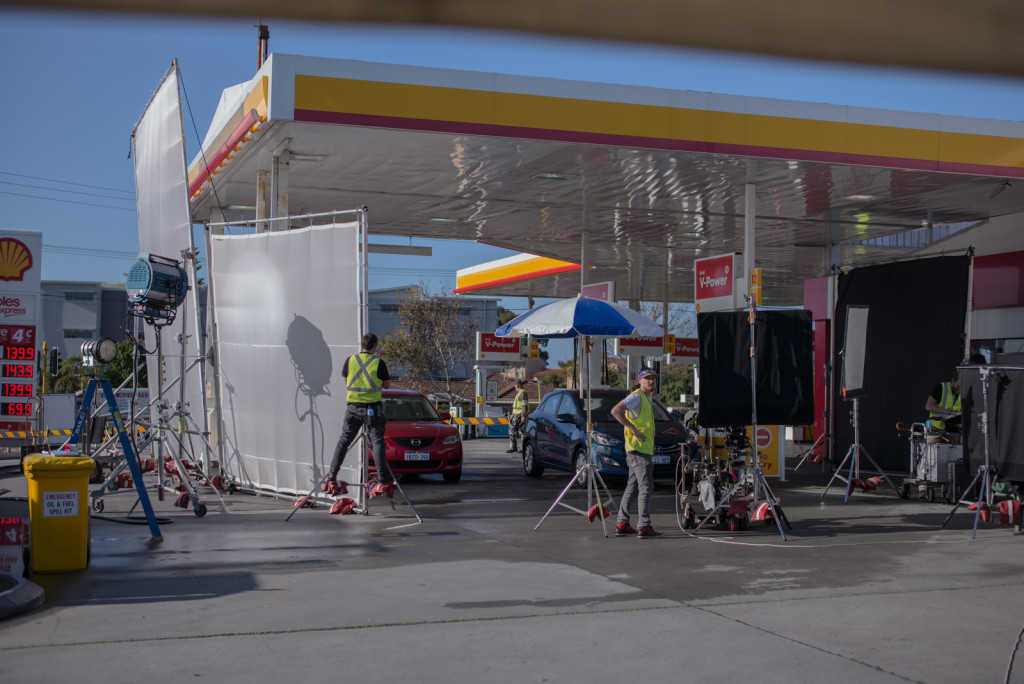
- Giant Silks. On the tech scout we decided to silk the entire camera left side of the gas station. The strong directional sun was about as unattractive as you can get. So to soften the light and the contrast I went with the jumbo rags.
- 12k (would have gone 18 but that wasn’t an option) just off the side camera left. Shooting through a 12×12 which was serving two purposes. Soften the 12k and soften the sunlight hitting the ground in the foreground.
- The wet look. Yea it is wet on the ground and sunny. Just believe.
- Negative Fill. Hard to do but tried to kill as much of the light bouncing around as possible with 12x blacks on camera right just out of frame.
- Mirror Bounce. Used a mirror bounce to brighten up the signage so that read.
Here is the lighting diagram I sent through to the gaffer the day before:
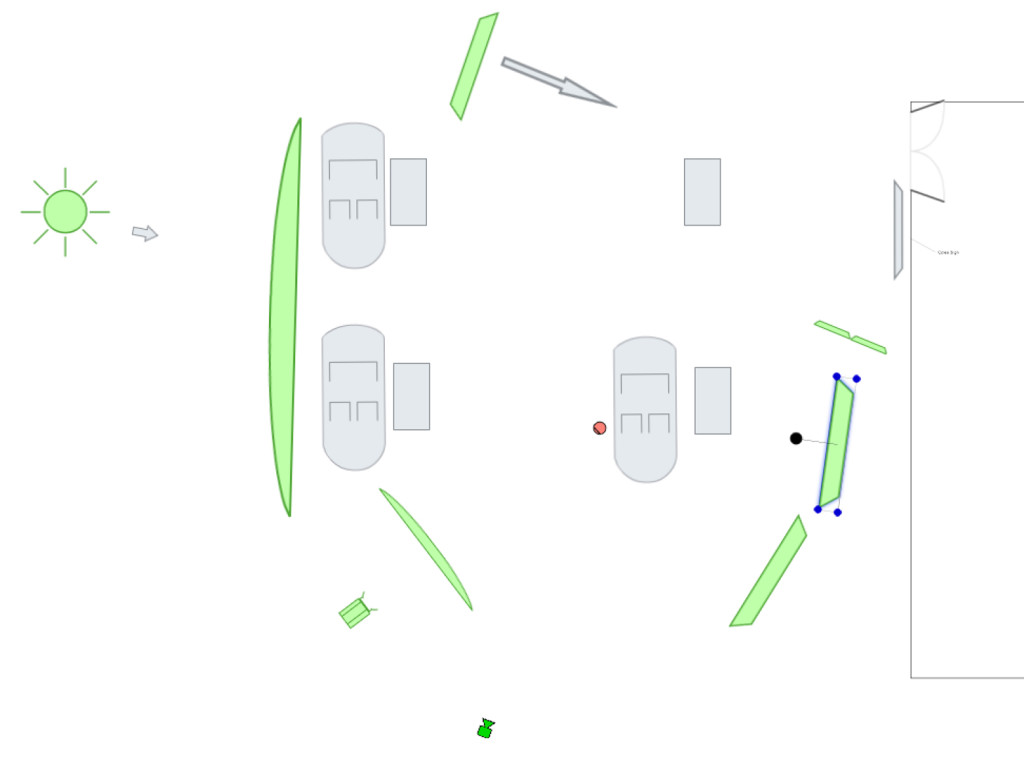
The main thing here was to shape the light enough on the talent that it looked nice but also keep the very last bit of highlight information in the background as well.
I know that if I save every highlight than I can bring down everything by at least two stops. The only problem is if you miss a little the whole plan goes to shit. You have to save everything or else you get this giant blob of terrible in the middle of your nice shot ruining the whole bring down effect.
So I saved every stop by adjusting the ISO from 250 up to 500 to get myself an extra stop in the highs and thatallowed me to save every bit of detail in the background which could then be pulled down in the grade. It does help to know what you can and can’t get away with from the grade. (free tip: Learn DaVinci)
I think we were on the 75mm for this which allowed me to get a bit closer in with the rags and we would have been shooting around T2 – T2.8 to get a bit of info in the signage as well as the talent.
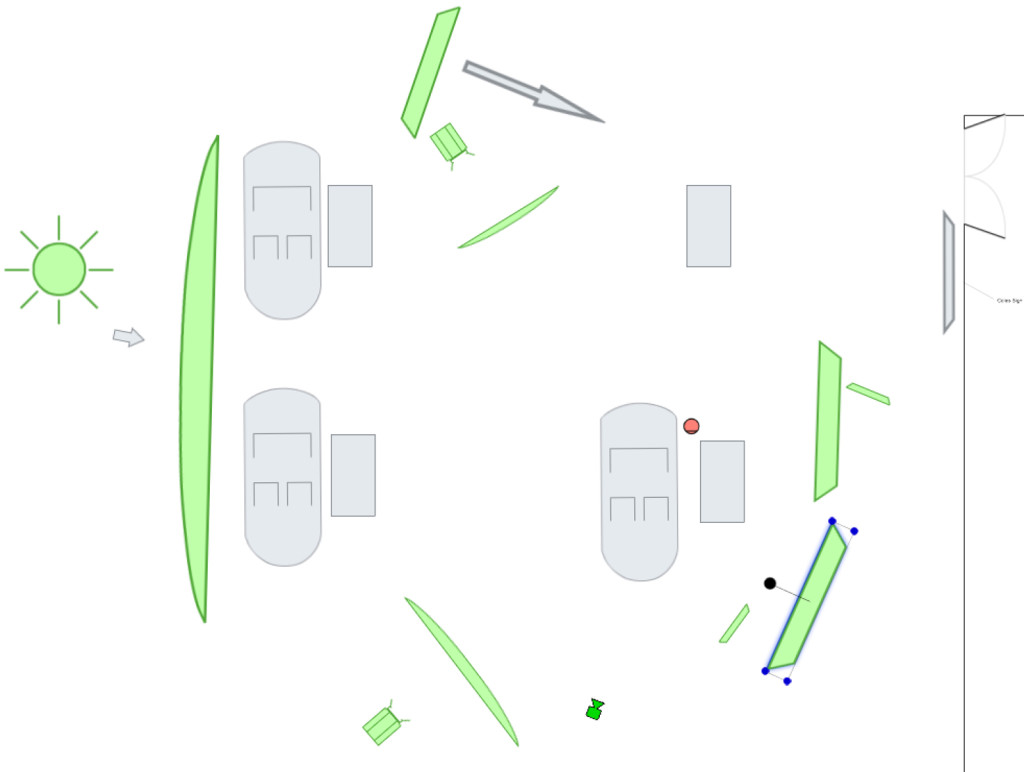
The Medium
The Problems:
- The 90 degree key was ugly. Real ugly. We couldn’t change the orientation of the action or the talent.
- The background was super hot.
- Couldn’t get lamps in close because it was a live petrol station and they don’t like 12ks next to flammable liquids.
The Solutions:
- Soften and then Soften again.
- Once softened add copious amounts of Negative fill to add shape.
- Shoot a slightly higher ISO to save the highs.
- Add an ever so subtle backlight.
The Diagram:
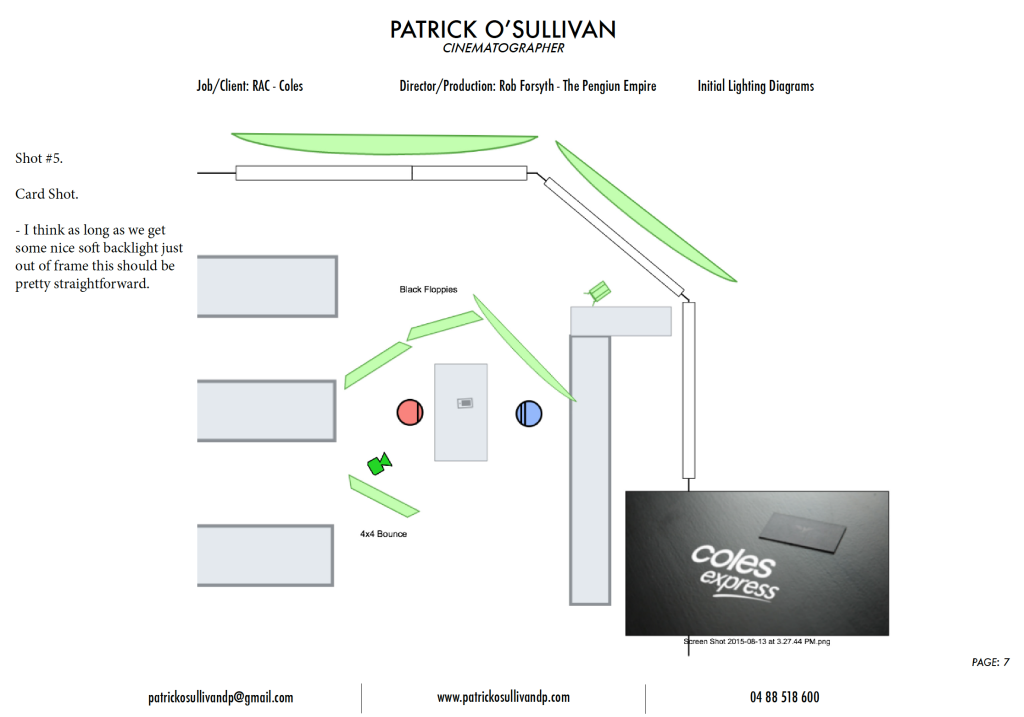
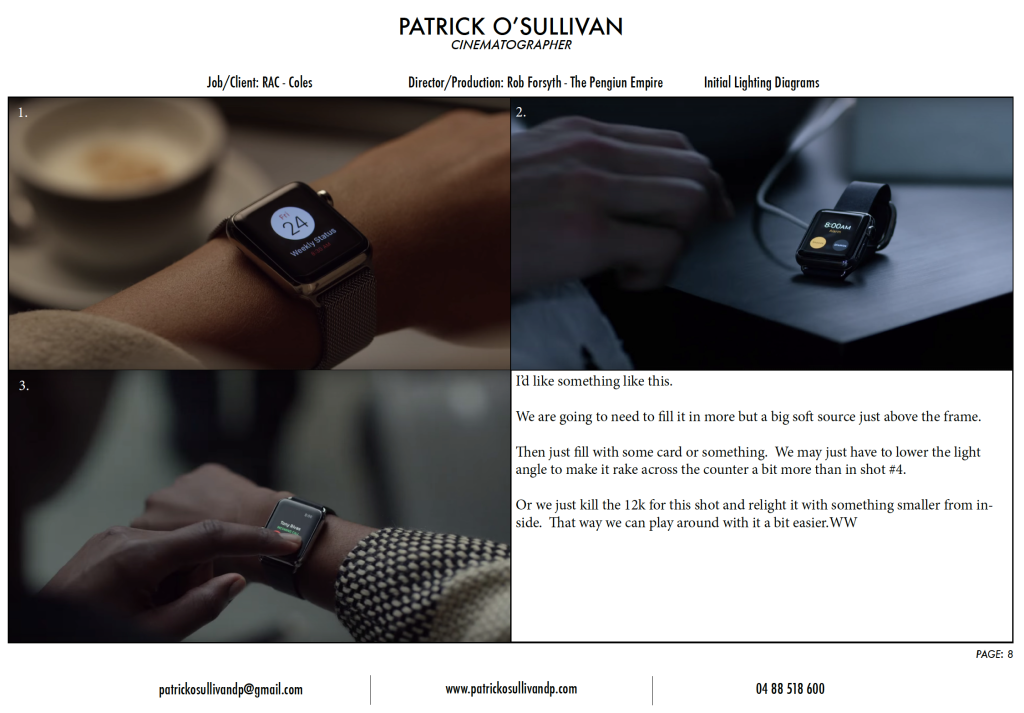
The Product
The Problem:
- Not problems. This was the easiest set up.
The Solution:
- A nice soft backlight.
- Add fill to desired level.
I had found some nice product shots from an Apple commercial that fit the bill nicely. I think they were Wally Pfister’s shots but I can’t be certain. Either way they are nice.
Below is a screen grab of part of the PDF I sent through to the gaffer the night before the shoot outlining what I needed.
Daylight Exterior – Wrap It Up
And then there were no more shots left.
That is the end of this breakdown. If you have any questions about the set ups or the lighting leave a comment and I will do by best to get back to you.
Hopefully it helps. The big thing to remember is that you have to no what you need to save beforehand in order to polish the image in the grade. If you go in blind there is a high chance you could end up getting burned.
The post The Wandering DP Podcast: Episode #45 – Daylight Exteriors appeared first on Cinematography Podcast & Tutorials. |


.png)
 More
More
 Religion & Spirituality
 Education
 Arts and Design
 Health
 Fashion & Beauty
 Government & Organizations
 Kids & family
 Music
Music News & Politics
 Science & Medicine
 Society & Culture
 Sports & Recreation
 TV & Film
 Technology
 Philosophy
 Storytelling
 Horror and Paranomal
 True Crime
 Leisure
 Travel
 Fiction
 Crypto
 Marketing
 History